


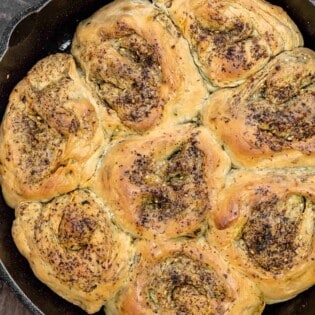
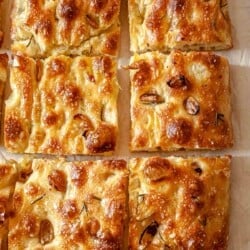
Learn how to make this rosemary focaccia bread recipe with an extra kick of flavor from roasted garlic. Once you master this crispy on the outside, chewy on the inside Italian bread you’ll make it on repeat!
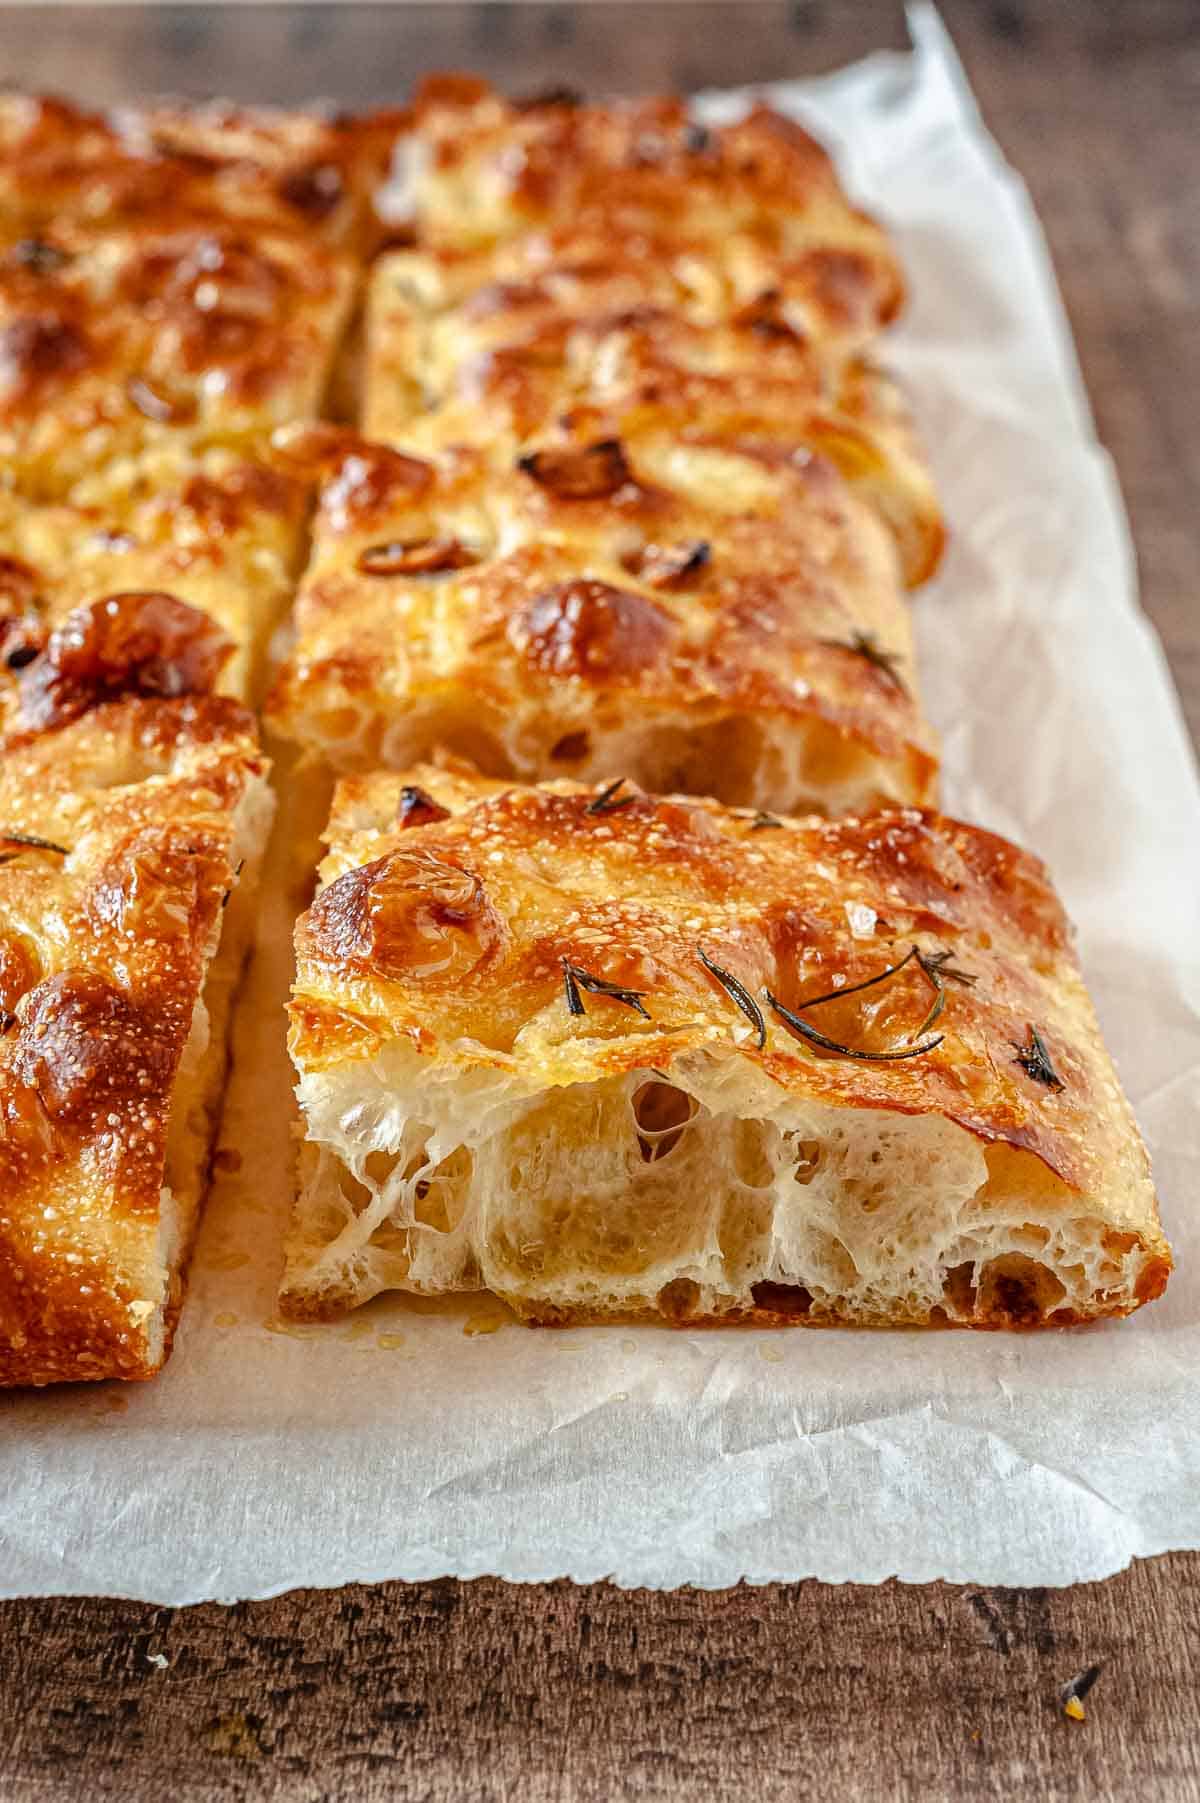
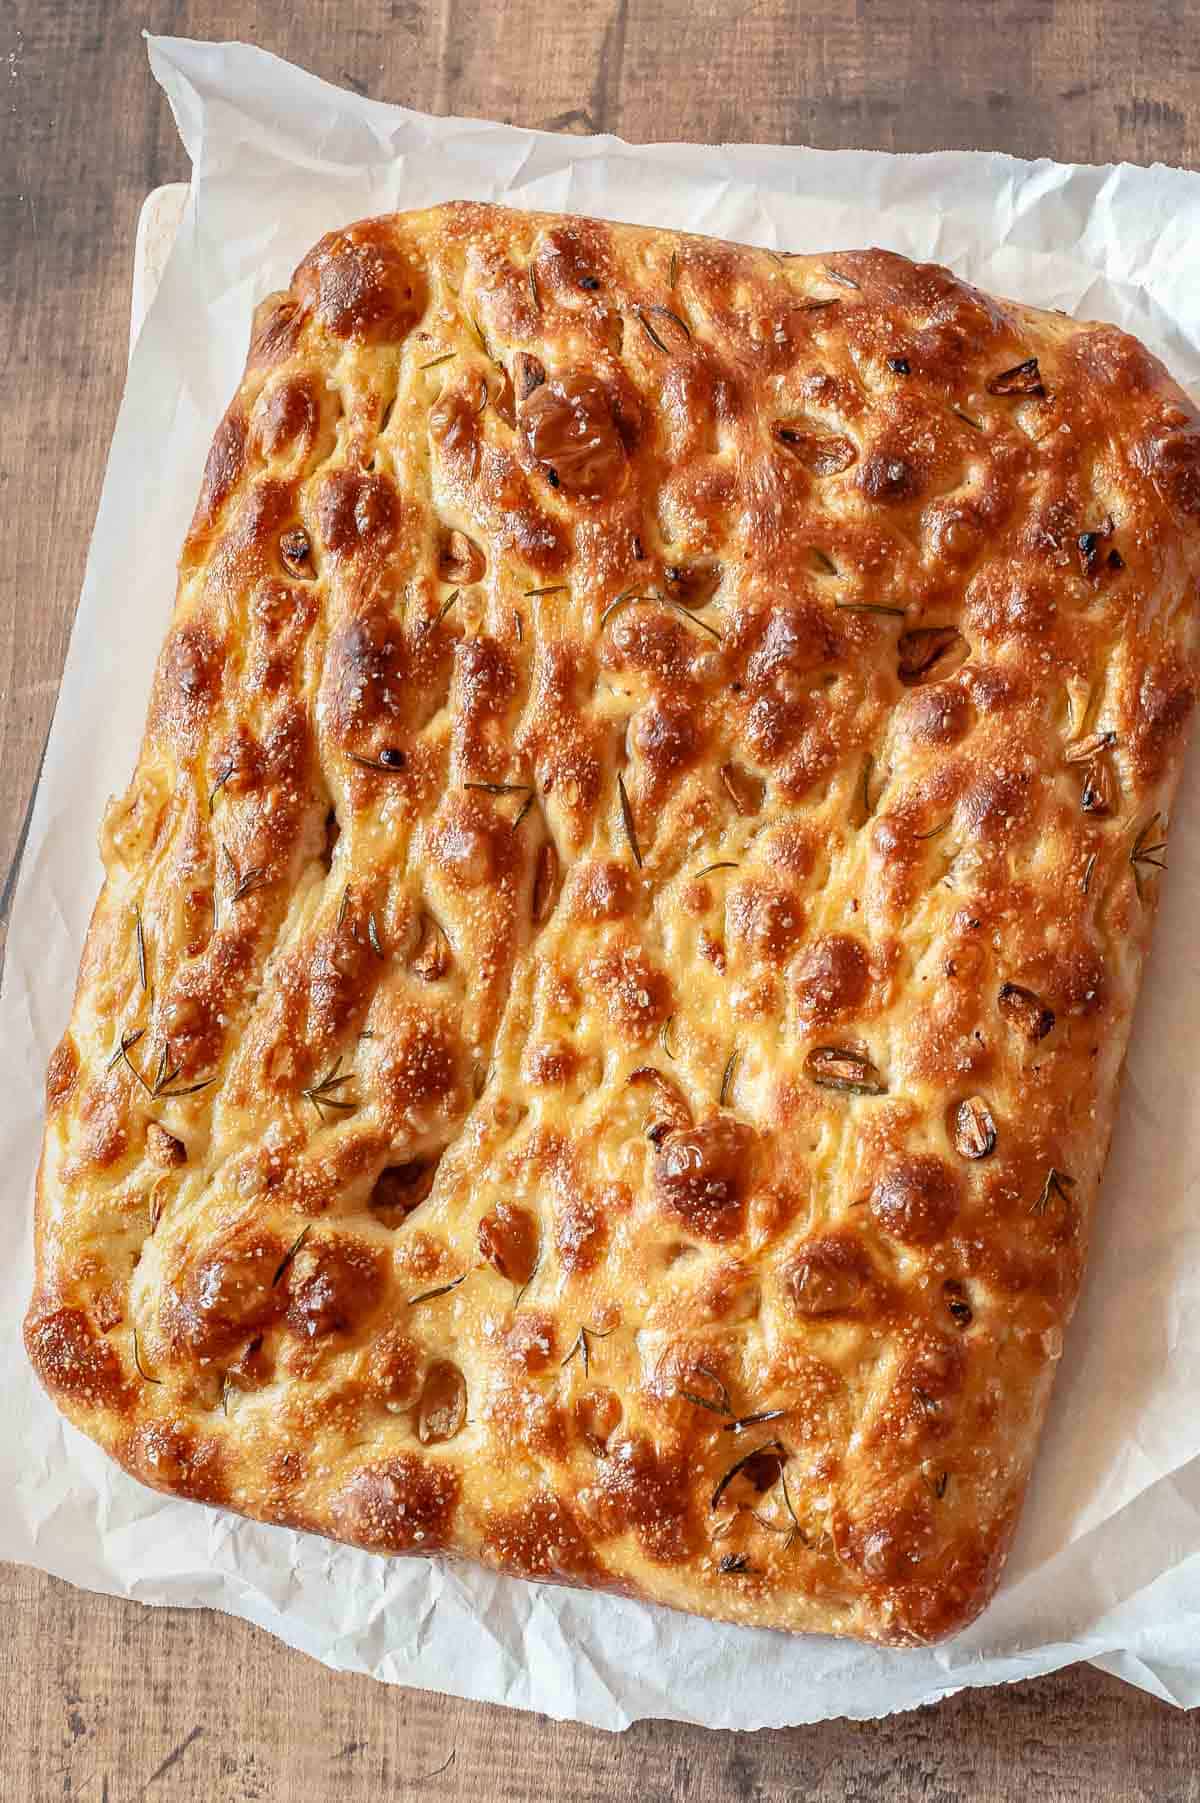
Making rosemary focaccia (fuh-kaa-chuh) bread is an immersive experience. Watching the dough transform from a sticky mass to a chewy, golden sheet of pillowy bread dotted with rosemary, roasted garlic, and olive oil is nothing short of miraculous.
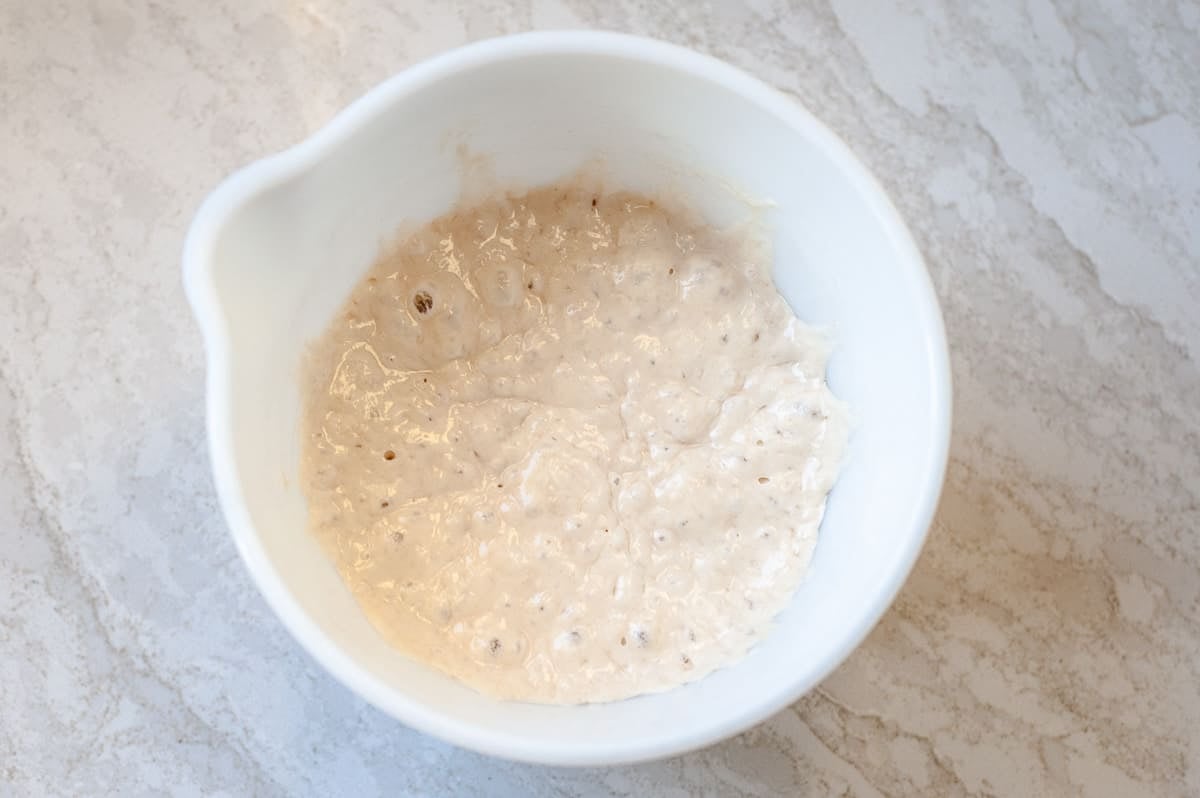
For this Rosemary Focaccia with Roasted Garlic recipe I begin with an Italian pre-ferment or starter called a biga. It’s not as fancy as it sounds — it’s just a mixture of flour, water and a little yeast that sits overnight in the fridge. When used to make bread, bigas add flavor and texture.
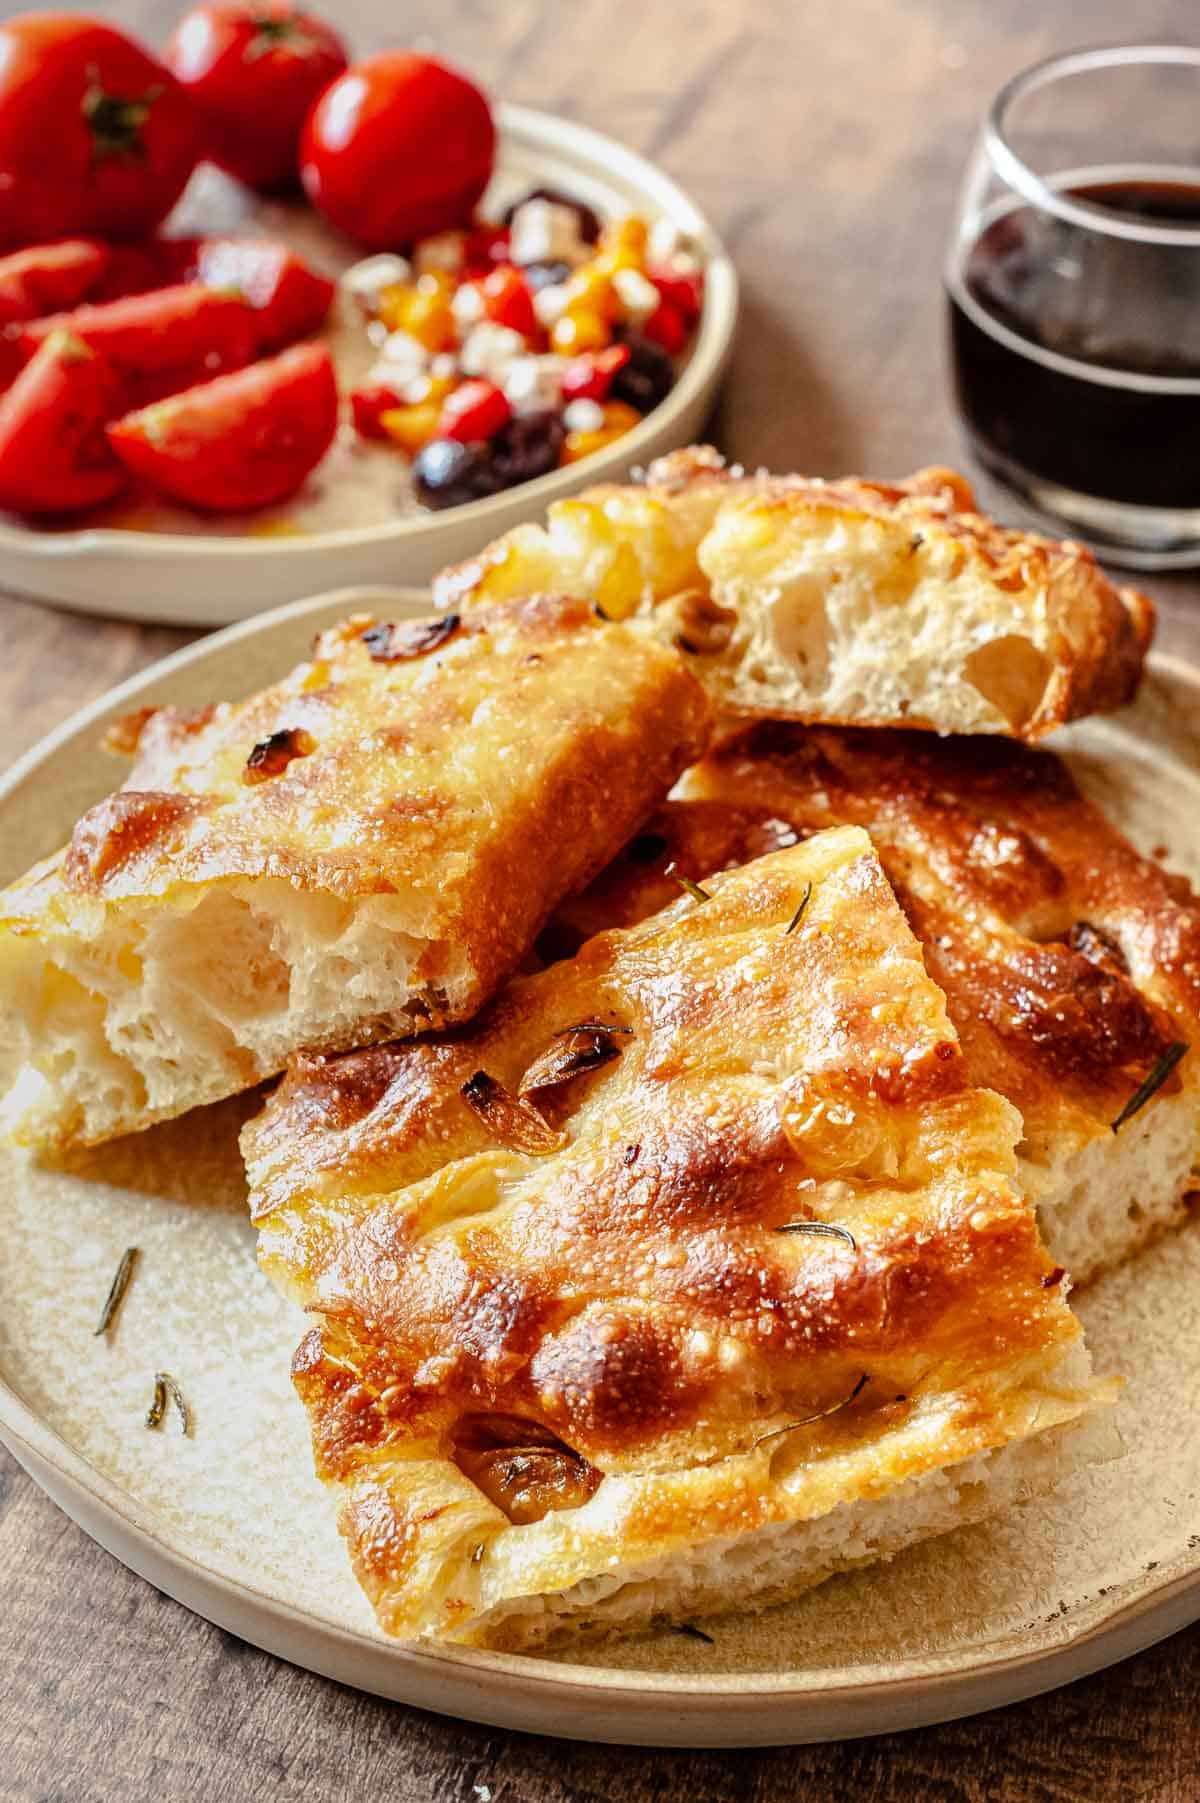
Once the dough is made, just stretch it, then dimple it in a bath of olive oil to create its signature peaks and valleys – perfect for holding pockets of flavor. Add fresh rosemary, and roasted garlic then pop it in the oven. Once it’s ready slice the focaccia in half and use it for sandwiches, cut strips and dip it into your favorite brothy poached eggs, braised chicken, soup, or stew, or enjoy it on its own.
Once you’ve learned how to make focaccia you’ll wonder what took so long!
Table of Contents
What is focaccia?
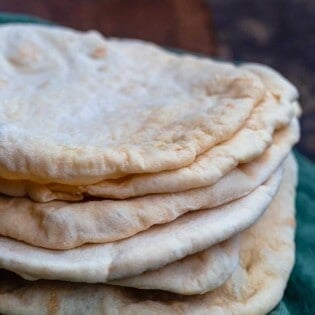
Focaccia is an Italian flatbread. It can be thick and pillowy or thin with chewy, crispy edges. I like mine somewhere in the middle. How to make focaccia is totally up to you! Use this recipe to make your focaccia thick or thin and dress it up with any flavor combo you can imagine.
- For a thick focaccia: Bake it in a 9×13 cake pan.
- For thin focaccia: Stretch it on a half-sheet jelly roll pan (Cookie sheet with sides).
What is biga?
Biga is a pre-ferment similar to a sourdough starter or a poolish. It is a combination of flour and water, with a touch of active dry yeast added to kick start everything. Then you let it sit overnight and up to 48 hours in the fridge.
A biga adds flavor and complexity to bread dough. It is commonly used in breads like focaccia that need an open, light and airy texture.
Once you get the hang of using a biga for bread baking you can use it in all kinds of bread. I first learned how to make it more than a decade ago when I was researching my book New Prairie Kitchen, and I have never looked back.
What does focaccia taste like?
Focaccia is chewy and loaded with olive oil. Some people equate it to pizza, because you can pile toppings on it, but I don’t think that’s an accurate description.
It has a thin chewy crust with crispy bits due to the olive oil and the inside is pillowy, light and almost melts in your mouth due to the air bubbles created during the stretching and dimpling process.
The woody herb rosemary is a perfect match when learning how to make focaccia bread because it’s sturdy and adds both flavor and texture to the bread while not overpowering the olive oil.
What’s in focaccia?
Like most breads the ingredients are pretty simple. That’s the beauty of it. For this focaccia recipe we have:
- Flour: I use bread flour because it has a higher protein content than all purpose flour, which allows the bread maintain a better structure, but if you have all purpose flour then it will work too.
- Active Dry Yeast: I buy yeast in a jar because I bake a lot and I like measuring it out by the teaspoon. Make sure your yeast is fresh. If it’s old it won’t foam up and it won’t help your bread rise.
- Water: The temperature of water is important in when making focaccia. Too hot and it will kill the yeast. You want to keep the water around 90-100° F
- Salt: I use Kosher salt in the dough and sprinkle the top with flaky sea salt just before serving, but that’s totally optional.
- Olive oil: Since this is an Italian recipe, why not try our Italian Nocellara EVOO, a medium-intensity oil with a slightly bitter, spicy finish.
- Rosemary: Rosemary has to be one of my favorite herbs to use when making focaccia. It’s fragrant, but woodsy and pairs well with so many combinations. I pair it here with roasted garlic but you could also use thyme, red onion, or mushrooms.
- Roasted garlic: You can make roasted garlic one bulb at a time or if you’re like The Mediterranean Dish crew you can make in bulk by roasted many bulbs. Store it in the fridge to add pops of flavor at anytime. Roasted garlic becomes spreadable and has a caramelized sweetness to it. Feel free to use garlic confit instead!
Roasting Garlic is Easy!
Use roasted garlic to add flavor to spreads, soups, breads and mashed potatoes!
Whether you need to roast a little or a lot of garlic we’ve got you covered! Our guide on How to Roast Garlic shows you three different ways to roast this powerhouse flavor booster so you never have to go without!
How to make focaccia
If you’re new to bread baking, focaccia is one of the easiest breads for beginners. You don’t knead it. It’s forgiving if you forget about it, and if you run out of time or plans change, just pop the dough in the fridge and pick up where you left off tomorrow.
The time that goes into making focaccia is mostly inactive. It’s during these slow rises and massaging of dough that the flavor develops. If you’re going to make homemade focaccia, it might as well be the best homemade focaccia.
Rosemary focaccia is the perfect recipe for a Saturday afternoon of folding laundry. Put a load in, stretch the dough, transfer clothes to the dryer, stretch the dough, fold the laundry, stretch the dough. You get the idea.
- Make the biga: Combine equal parts of flour and water by weight with a little yeast. Let it sit on the counter for about 90 minutes then transfer it to the fridge overnight and up to 2 days. When ready it will look bubbly.
- Make the dough: Combine the water, biga, and 3 tablespoons of olive oil. Stir it together just to break up the biga a bit. Then add the flour, additional yeast, and salt.
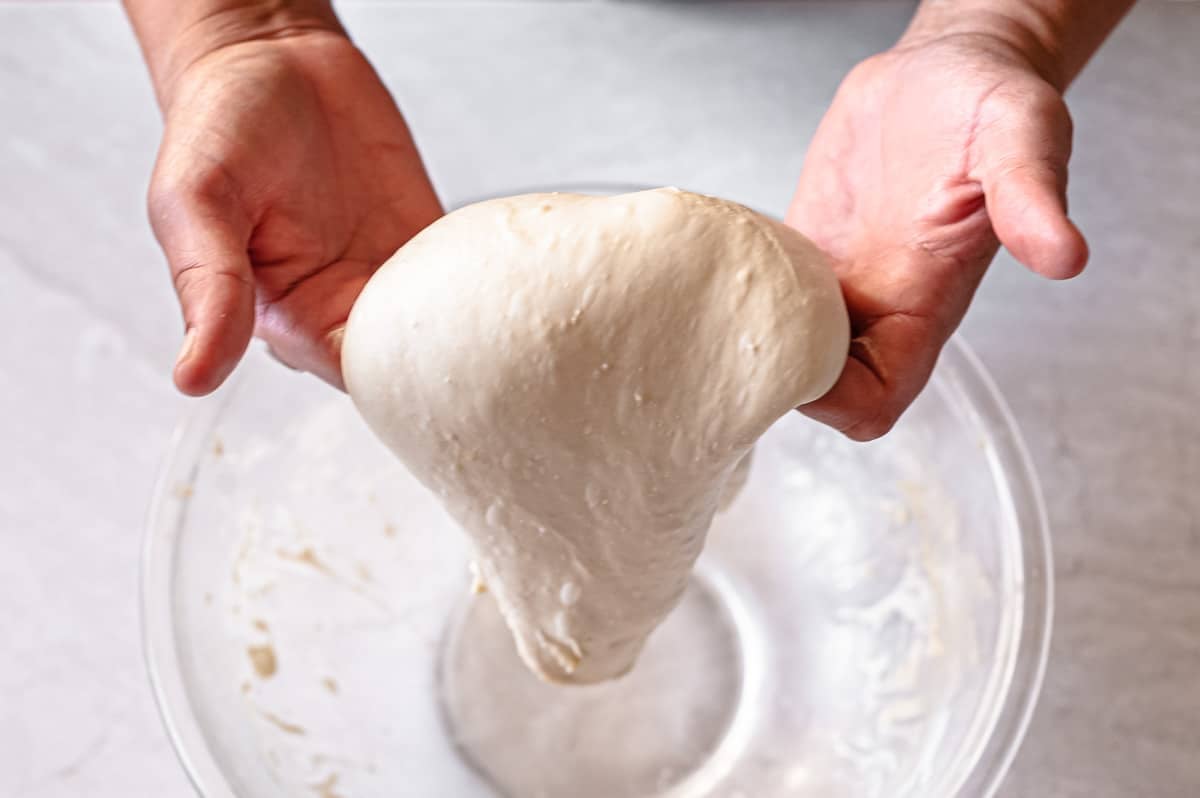
- Stretch and fold the dough: During this stage the dough will start sticky then transform to smooth. Tuck your fingers under the dough and lift it up out of the bowl letting the dough droop down over the sides of your fingers and fold into the bowl. Do this 3 times each time you stretch the dough.
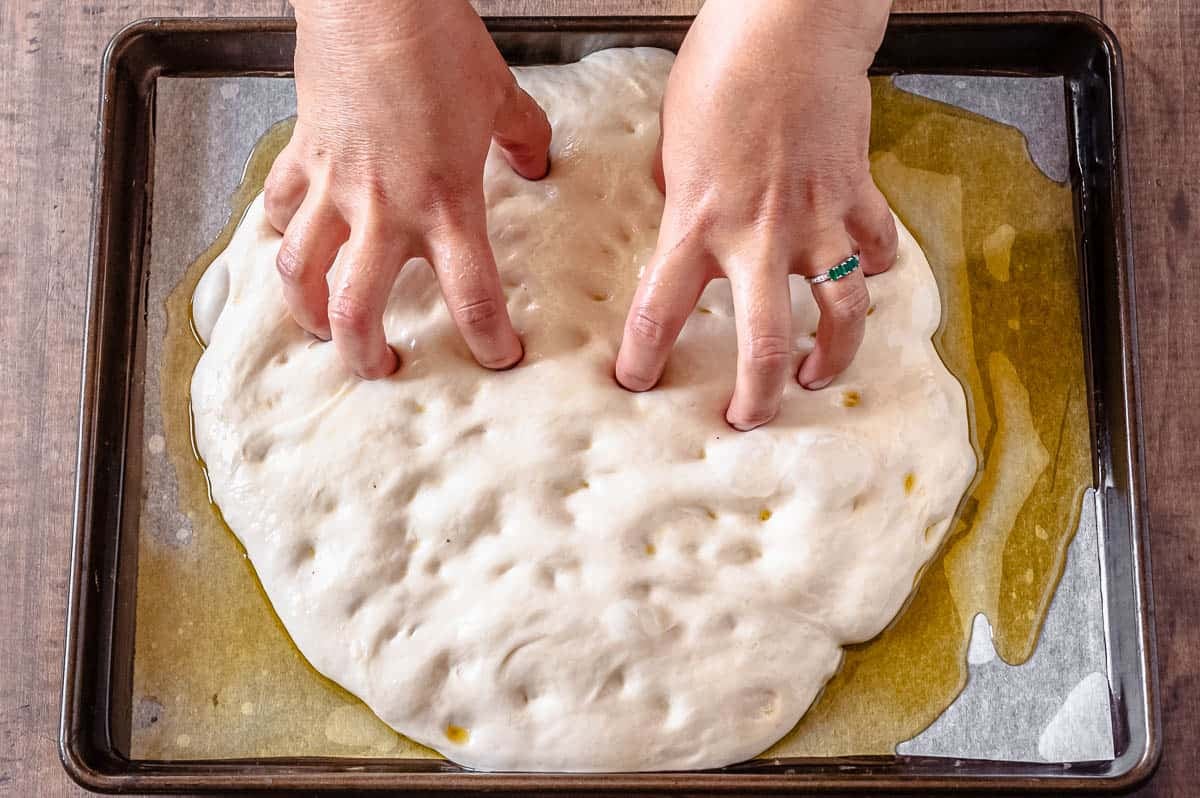
- Dimple the dough: Once the dough has been stretched, place it on a parchment lined heavily oiled baking sheet. Turn it to coat. Then twice an hour over the next 1 to 1/2 hours dimple the dough by pressing just your fingertips into the dough. Gently moving it closer to the edges of the pan each time.
- Add roasted garlic and rosemary: Before the final dimpling dot the top of the dough with roasted garlic cloves and rosemary. Season it with another drizzle of olive oil and flaky sea salt.
- Bake the focaccia: It only takes about 20-30 minutes for focaccia to cook. So keep an eye on it. You want it to turn a deep golden brown.

What to serve with focaccia?
I love the sweet caramelized flavors of roasted garlic. I don’t think people use it enough.
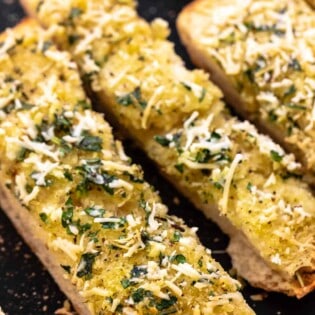
When paired with rosemary it creates a savory, fragrant bread perfect for topping with eggplant caponata. Cut it into strips to add to a party platter of dips like this creamy whipped feta dip or dunk it into soups like this roasted tomato soup, ratatouille or sausage tortellini soup.
It’s a great vessel for taking full advantage of brothy and delicious dinners, like chicken puttanesca or this tomato and pepper poached cod recipe. Or, pair the sweet-and-savory roast garlic with another naturally savory and just so slightly sweet delight: scallop pasta!
I might even be known to grab a slice or two on my way out the door to pick my kids up from school. When it starts to get a little dry after a few days, turn it into croutons for your chicken caprese salad!
If some goes stale on you, use it as a flavorful base for Sopa de Ajo, Spain’s take on garlic soup!
Ways to make this recipe your own
Consider this focaccia bread recipe your jumping off point for endless focaccia flavor combinations. Here are a few ideas to get you started:
- Red onion, garlic and kalamata olives
- Mushroom and onion
- Grape tomatoes, thyme and basil
More bread recipes
Browse all Mediterranean recipes.
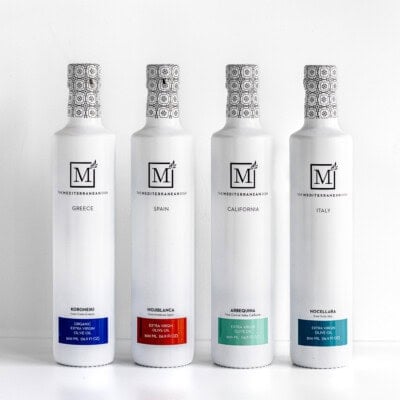
Visit Our Shop.
Bundle and Save!
Four of our best-selling signature olive oils—perfect for everyday use.
Ingredients
Biga
- 1/2 cup (125g) warm water (80-90°F)
- 1 cup (125g) bread flour
- 1/2 teaspoon active dry yeast
Focaccia
- All of the biga
- 1 ½ cups (350g )warm water
- ¾ cup olive oil, divided, plus more for coating
- 3 cups (375g) bread flour
- 2 teaspoons kosher salt
- 1/2 teaspoon active dry yeast
- 2 6-inch rosemary sprigs
- 1 large head garlic
- ¾ teaspoon flaky sea salt, divided
Instructions
- Make the biga: In a medium bowl combine the water, flour and yeast. Cover the bowl with plastic wrap and let it sit at room temperature for 1 ½ to 2 hours. Then transfer it to the refrigerator overnight and up to 48 hours.
- The next day make the dough: Remove the biga from the refrigerator. It will look fully hydrated, expanded and should be a little bubbly.
- Into a large bowl add the water, all of the biga (235g), 3 tablespoons of olive oil and stir to combine. It’s ok if it doesn’t totally come together, you just want to break up the biga a bit.
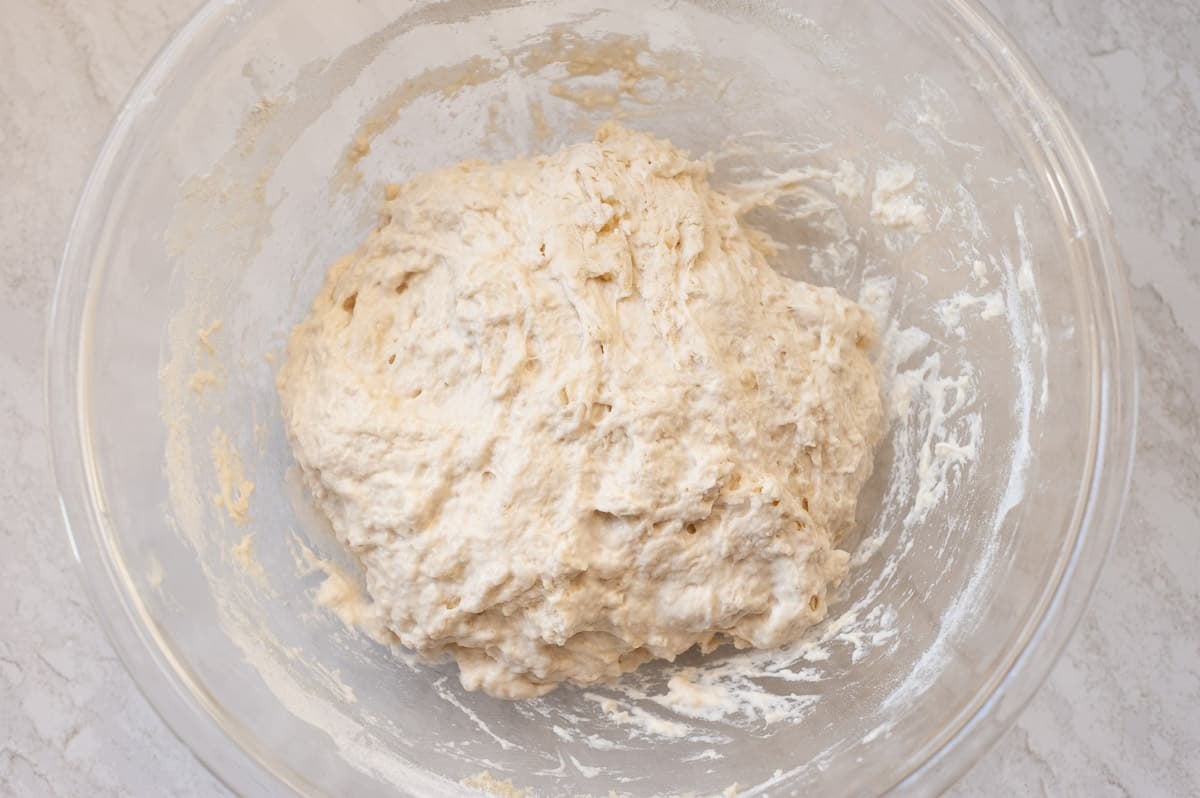
- Add the flour, salt, and yeast and stir with a wooden spoon until the flour is hydrated. You will have a sticky, bumpy, shaggy but homogeneous dough. Cover with plastic wrap and set it in a warm corner of your kitchen for 30 minutes.
- Lift and fold the dough: Wet your hands to stretch and fold the dough. To do this, scoop your fingers down the sides of the bowl so they meet under the dough in the middle. Lift the dough up above the bowl. You should have dough spilling over the top of your index fingers and your pinky fingers reaching down toward the bowl in an upside down U-shape. Put one end down in the bowl, then the other so they overlap a bit. Lift and fold the dough over itself 3 times. Coming from different edges of the dough each time. Cover with plastic wrap. Repeat this process every 30 minutes for the next 2 1/2 hours. You don’t want to rush this as it helps develop the structure of the dough and builds flavor.
- Transfer the dough to the baking sheet: Place a sheet of parchment paper in the bottom of a baking sheet for thinner focaccia or a 9×13 cake pan for thicker focaccia. Generously coat the parchment paper with 1/3 cup olive oil. Place the dough on the baking sheet or pan, and turn it over gently to coat.
- Stretch and dimple the dough: Spread your fingers apart and bend them like you’re trying to mimic the talons of a bird. Using the tips of your fingers gently insert them into the dough in multiple places, creating dimples and stretching the dough gently toward the edges of the pan. You will do this 3 to 4 times over the next 1 to 1 1/2 hours.
- Preheat the oven to 450°F.
- Roast the garlic: While you rise and stretch the dough, roast the garlic. You will add the roasted garlic to the dough during the stretching process.
- Using a sharp knife, slice the top ¼ to ½-inch off the top of the garlic bulb exposing the individual cloves. Remove any loose papery skins. Place the garlic cut side up in the center of a piece of foil large enough to envelope the bulb.
- Drizzle the garlic with 1 tablespoon olive oil and sprinkle it with salt and pepper. Make sure the whole bulb is coated in the oil. Fold the foil around the garlic. Place it in a small baking dish or ramekin and pop it in the oven for 25-30 minutes. When it’s ready the cloves will be soft, and creamy.
- Add garlic and rosemary to the dough: Remove the garlic from the oven, open the foil and let it cool until it’s easy to handle but still warm. Press on the uncut base of the bulb to squeeze the cloves out. Drop them onto the focaccia dough in different places.
- Strip the rosemary sprigs of their needles and sprinkle them across the dough. Press the garlic and rosemary into the dough when you dimple and stretch it.
- Add olive oil and dimple one more time: Before the final dimple, drizzle 3 tablespoons of olive oil over the bread and sprinkle with ½ teaspoon of flaky sea salt. Dimple it again.
- When all is said and done the dough should be coated in oil, pretty close to the edges of the sheet pan, and have lots of bubbles and dimples.
- Bake the focaccia: Place the sheet pan in the oven and bake for 18-20 minutes. When it’s done it should be golden brown with darker brown bubbles. Remove from the oven.
- Drizzle with more olive oil and sprinkle with a ¼ teaspoon flaky sea salt. Give it about 5 minutes to cool, then transfer it to a cutting board. It should be crisp on the outside, tender, slightly chewy and full of air pockets on the outside. Eat it as is or top it with my favorite, eggplant caponata.
Video
Notes
- Mix it up: Get creative with your additions. Use olives, try different herbs like time, basil or oregano. Top with grape tomatoes red onion or prosciutto.
- I use bread flour because the higher protein content provides a stronger structure for the bread, but if you have all purpose flour on hand that will work too.
- Recommended Olive Oil: I prefer our Nocellara Italian Extra Virgin Olive Oil, but our Spanish Hojiblanca Olive Oil with its peppery finish is also delicious with focaccia.
- Visit our store to browse our spices, olive oils and bundles!
I made this focaccia to go with a Tuscan style stew I was making for some dinner guests and it was the perfect side dish.
It is time consuming but worth the effort because it has a great texture, great flavor and makes a large amount for plenty of seconds!
I am glad there was a video because it was super helpful to understand what the words were telling me to do. I found watching it several times, gave me a lot of confidence. One little change I did do was to scrape the garlic out and spread it with the back of a spoon to have more coverage over the entire surface. It is such an excellent flavor profile! I will for sure make this again.
Wonderful! Thanks for the feedback, Sue!
I have been on a quest to find the best tasting focaccia recipe for quite some time. After trying numerous recipes from other cooking sites and cookbooks, this is definitely it! It is a bit time consuming, but so worth it. My only minor negative is that the “How to Make Focaccia” instructions don’t mirror the recipe instructions. I went with the recipe and it was fabulous. This will be my go to focaccia recipe from here on out. I’m excited to try it with other toppings.
do I have to let the biga sit overnight? Or can I start making the dough after the 2 hour rest period from step 1?
Hi, Heather! Great question! I would let the biga rest overnight because during that time the yeast becomes active (you will see the biga get light, full, and bubbly.) If you want to speed the process up you could leave it on your counter for maybe 5 hours or so, rather than do the overnight rise in the fridge, but I have never made it that way. All that chill time imparts flavor and provides the structure to your bread. Let us know what you did and how it turned out. I love hearing about experiments our fearless readers embark upon in their own kitchens!
I made this recipe using quick-rising bread machine yeast, and it was wonderful. I have never used active dry yeast before. Do I just add the yeast granules to the biga and dough mixture or do I need to make a mixture using sugar and water or something like that?
Hi, Jeff! I’m Summer and I work with Suzy here at The Mediterranean Dish. Glad to know the recipe works using quick-rising yeast as well. You can follow the recipe exactly as it’s written using active dry yeast. Just put a little yeast in with the flour and water when making the biga. Then add the remaining yeast when making the dough in step 4. There is no need for sugar or a special mixture to bloom the yeast as along as you know your yeast is healthy. If you have an old packet of active dry yeast and you’re not sure if it’s good anymore, you can test it to make sure it’s good before going through with the whole recipe. To do this, add the 1/2 teaspoon of active dry yeast to the 1 1/2 cups of warm water (between 90-100°F) called for in the dough section of the ingredient list and a pinch of sugar. Wait 5 minutes. If the yeast is frothy it is good to go and will make delicious bread. Just proceed with the recipe. If it’s not your yeast is probably dead and you should run to the store to get a new packet of yeast. I hope that helps.
Thanks for the prompt response to my yeast question. Can’t wait to try this recipe again!
Anytime! We love our community here at The Mediterranean Dish.
This is the best focaccia I have ever made so far. Thank you!
So glad you enjoyed it, Audrey!
That was amazing! You are amazing.
It turned out perfectly – crisp on the outside, chewy in the centre, wonderful flavour. I omitted the garlic and added pine nuts. The day 2 part of the recipe took about 4 hr – perfect for a rainy day.
That’s wonderful to hear. Bread baking on rainy days is my FAVORITE thing to do. Thanks for letting us know how it turned out!
Hi Suzy! I’m making this bread today. When the dough rests between the multiple “lifting and foldings”, should it be at room temp, or in a bit warmer spot? thank you!
ps – I made your balsamic chicken yesterday – so delicious.
Hi, Jane! I’m Summer I work with Suzy. When I make this bread, I just leave it on my counter at room temp. Let us know how it goes!
I made this for a party. It was a hit! Everyone loved it! I will definitely make this again!
Love your recipes
I tried to let u know I wanted to down load the E book. Every time I tried it wouldn’t deliver it to you
Thank you for your help
Hi, Joanne! So sorry about that. I’ll have someone on the team email that to you.
Hi,if you asking me,I give 5star to all your recipes,I loved,I have a question #1where I can buy your recipes CD so I can see how you prepared those delicious food.my husband is diabetic and need to lose weight do you have something for him to, Thank you
Hi, Corina. Thank you so much for reaching out, and for the kind words! Suzy does not have a recipe CD. All of her recipes can either be found here on her website, or in her new cookbook. You can also find most of her instructional videos on YouTube. Hope that helps a bit!
Hi Suzy, quick question, could you tell me the dimensions of the baking sheet? I have a few different sizes and it’s kinda hard to tell which size you are using in the video. I’m gonna give this bread a go! I’ll let you know how it goes!! It looks so delicious! Thank you!
Hi, Lola! It’s Summer. I work with Suzy. The baking sheet has sides and it was about a 12×16. Thrilled you’re going to give it a go. Please report back and let us know how it went! I LOVE this bread. I hope you do too.
Is this baked in a hot oven, say 375° or higher?
Hi, Barb! I’m Summer, I work with Suzy here at The Mediterranean Dish. The focaccia bread is baked in a 450°F oven.
Excited to give this a try! Curious as to the size of piece used in the nutritional calculations as I’m trying to watch my carbs? Thanks!!
Hi, Tamela! I’m Summer, I work with Suzy here at The Mediterranean Dish. We cut the focaccia into 12 pieces so they are pretty large pieces. You can always cut them smaller too. Whatever works best for you!
I cannot use regular white flour, can I substitute equal amounts of whole wheat pastry flour or another kind of flour in the recipe?
Hi, Sue — Thrilled you’re interested in trying this recipe. I have never made it with whole wheat flour but I think it would taste great. I used bread flour which is high in protein, so I would probably go with a regular whole wheat flour or a whole wheat and pastry flour blend. Keep in mind whole wheat flours tend to need additional hydration so you may need to add a little more water — 3 to 4 tablespoons. Love that you want to experiment. Let us know how it goes!
Can you just use a sourdough starter instead of the biga?
Hi, Vernita! I’ve never made it with sourdough starter, but I think it would work just fine as long as you have a healthy and active starter. Let us know how it goes!