
You will love this roasted garlic hummus—creamy, sweet, and smoky. And just a touch spicy.
My Not-So-Traditional Hummus Secret: Roasted Garlic
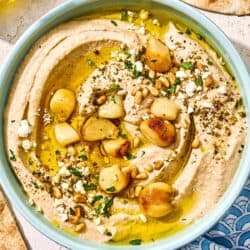
Another day, another hummus dip, y’all! My roasted garlic hummus is easy and loaded with two heads of roasted garlic! If you have any Mediterranean blood in you, as I do, garlic probably doesn’t scare you. But if you just screamed, “That’s a lot of garlic!” Hear me out.
Do not fear the garlic! Once roasted, garlic’s pungency is replaced with a rich, sweet, and smoky flavor. And here, it lends its glorious flavor to the neutral-tasting chickpeas. Add in earthy tahini, and a little zing from sumac and za’atar…Heaven!
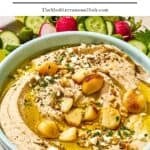
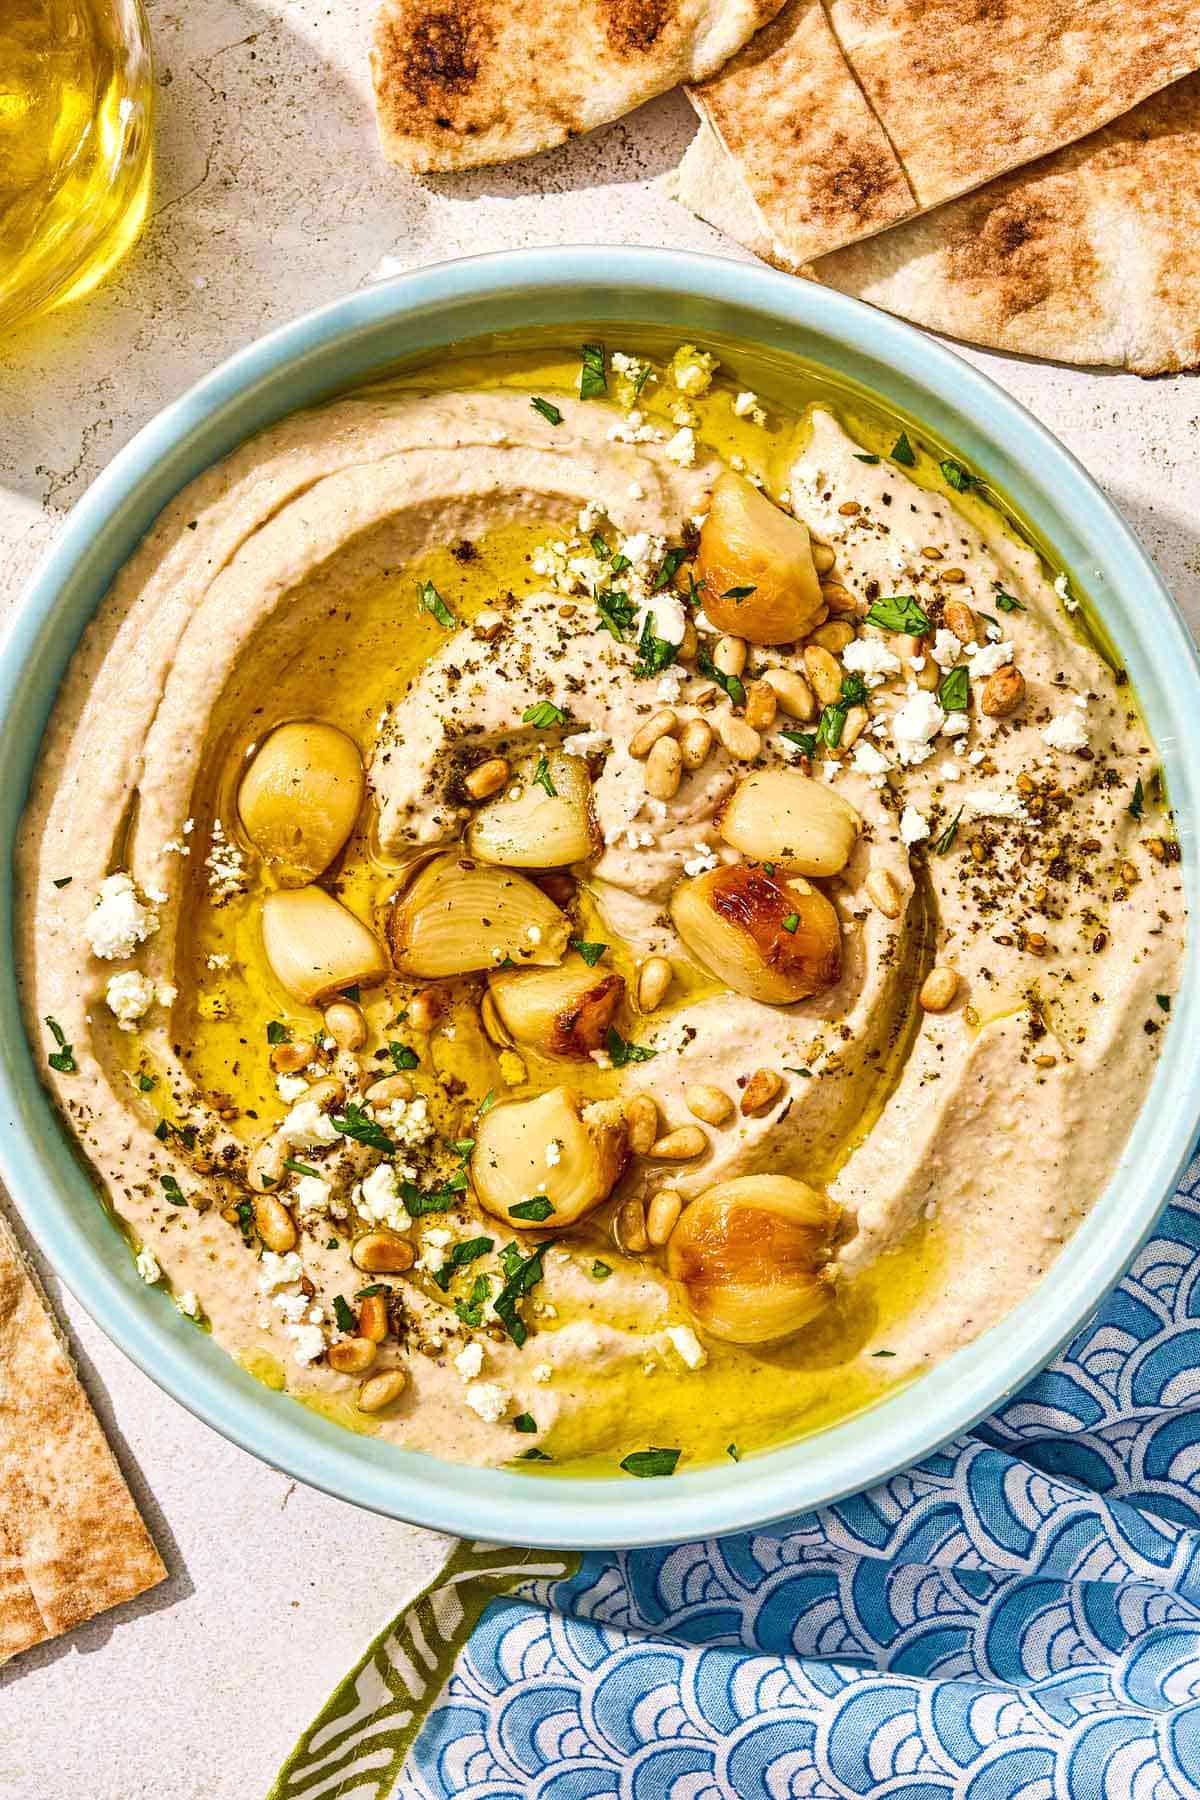
I perfected my hummus skills under the guidance of my mother-in-law, who ran a Mediterranean restaurant for many years and made countless batches of classic hummus. She keeps things pretty traditional, but I have to go the extra mile, so I garnish mine with additional roasted garlic cloves, toasted pine nuts, parsley, and feta. It’s a show-stopping way to start a party. Just serve with homemade pita, veggies, or pita chips.
Why You’ll Love This Recipe
- If you are a garlic lover, this dip is for you.
- It’s easy, I use canned chickpeas as a shortcut.
- Make-ahead friendly: Make it the day before you want to serve it and check one thing off your list!
Roasted Garlic Hummus Ingredients
- Garlic is the star of the show! I use 2 whole heads of garlic and roast them in the oven to soften the intensity and give this hummus recipe a little depth.
- Extra Virgin Olive Oil: I use it to roast the garlic and drizzle it over the top. I always go for quality EVOO since it’s a flavor component in the recipe.
- Chickpeas: To make things easy, I use canned chickpeas for this recipe. For ultra-creamy hummus, you’ll want to rub the chickpeas together under running water to remove the skins. If you don’t mind a little texture, you can skip this step. If you make chickpeas from scratch, you’ll need 2 1/2 cups.
- Tahini: I’ve said this before, and I will say it again. If you’re going to make hummus of any kind it must have tahini, and you want one with a nutty, not bitter flavor. My favorite is Soom.
- Lemon juice brightens, balances, and lifts the rich flavors of the hummus.
- Seasonings: I add Sumac, a spice that adds a little color and a slightly sour flavor, cayenne for heat, and Za’atar, a Middle Eastern spice blend for complexity.
- Topping: I like to dress up my hummus a little bit. You don’t have to, but I think the combination of minced parsley, toasted pine nuts, and salty feta cheese elevates what is otherwise a humble bean dip.
How to Make Roasted Garlic Hummus
- Preheat oven to 400°F and fit your food processor with the S-blade.
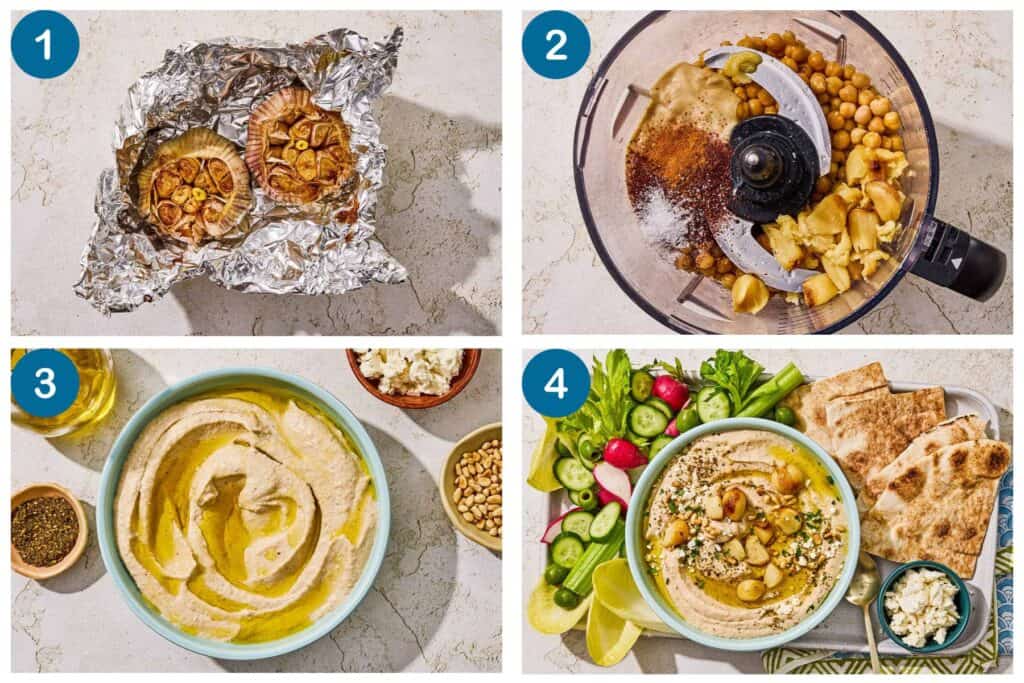
- Roast the garlic: Remove the loose papery outside skin from the garlic heads, but keep the cloves intact. Cut about 1/2 inch off the top of the head of garlic. Set each head of garlic in a piece of foil large enough to encase it. Lightly drizzle the sliced part of the garlic with olive oil. Close the foil up. Place in the oven for 40 to 45 minutes or until the garlic is very soft. Remove from heat and let cool briefly. Once cool squeeze the roasted garlic out of the paper husks into the bowl of the food processor.
- Process the hummus: To the bowl of a food processor, add the chickpeas, tahini, lemon juice, and water. Sprinkle salt, sumac, and cayenne. Blend until smooth. Be sure to add water 1 tablespoon at a time, until you achieve the desired smooth texture. You can also add a little more lemon juice to your taste. Taste and adjust for salt and spices.
- Serve: Spread the roasted garlic hummus in a bowl. Add a generous drizzle of extra virgin olive oil. Top with za’atar, and if you like, parsley, toasted pine nuts, and crumbled feta. Serve with warm pita bread or toasted crostini and assorted vegetables. Enjoy!
Tips and Tricks for Perfect Hummus
- Peel Your Chickpeas: Now, removing the chickpea skins, as I do in this tutorial, may seem a little persnickety. It’s the way to go if you want a silky-smooth roasted garlic hummus.
- Go rustic: Not feeling it? Be the daredevil who couldn’t care less and just leave the chickpea skins on (case in point, my roasted red pepper hummus.) You’ll have a more textured, rustic dip. Delicious, still.
- Roast a big batch of garlic: One awesome tip that saves a ton of time, especially if you love roasted garlic and plan to use it to jazz up salads, dips, or sandwich spreads. Roast a bunch of garlic in advance and store it so it’s ready for use. Check out my post How to Roast Garlic for all the details.
- To store: Roasted garlic hummus will last for up to 4 days in the fridge. Feel free to make it a day ahead of when you want to serve it, cover tightly, and keep it in the fridge until it’s party time. Garnish right before serving.
Ways to Serve with Roasted Garlic Hummus
A lot of people only think of hummus as a dip, and it is. You can certainly include it as part of a mezze with other Mediterranean sides, but you can also use it as a base for grilled meat or a spread for your favorite sandwich. I even make hummus breakfast bowls.
More Hummus Recipes
When it comes to hummus, I’m open to being creative. I have added everything from peppers to carrots, and I’ve even topped it with meatballs and made a layered hummus dip. Here are a few of my favorite variations on classic hummus.
Ingredients
- 2 heads garlic
- Private Reserve Greek extra virgin olive oil
- 2 (15-ounce) cans chickpeas, drained. Skins removed, if desired or 2 1/2 cups cooked chickpeas.
- 1/4 cup tahini
- 3 tablespoons fresh lemon juice
- 2 tablespoons water, more as needed
- salt
- 1 teaspoon sumac
- 1/2 teaspoon cayenne pepper, optional
- 1 teaspoon za’atar spice
- 3 tablespoons chopped fresh parsley, for garnish
- toasted pine nuts, for garnish
- crumbled feta cheese, for garnish
Instructions
- Preheat oven to 400°F and fit your food processor with the S-blade.
- Roast the garlic: Remove the loose papery outside skin from the garlic heads, but keep the cloves intact. Cut about 1/2 inch off the top of the head of garlic. Set each head of garlic in a piece of foil large enough to encase it. Lightly drizzle the sliced part of the garlic with olive oil. Close the foil up. Place in the oven for 40 to 45 minutes or until the garlic is very soft. Remove from heat and let cool briefly. Once cool squeeze the roasted garlic out of the paper husks into the bowl of the food processor.
- Process the hummus: To the bowl of a food processor, add the chickpeas, tahini, lemon juice, and water. Sprinkle salt, sumac, and cayenne. Blend until smooth. Be sure to add water 1 tablespoon at a time, until you achieve the desired smooth texture. You can also add a little more lemon juice to your taste. Taste and adjust for salt and spices.
- Serve: Spread the roasted garlic hummus in a bowl. Add a generous drizzle of extra virgin olive oil. Top with za'atar, and if you like, parsley, toasted pine nuts, and crumbled feta. Serve with warm pita bread or toasted crostini and assorted vegetables. Enjoy!
Video
Notes
- To roast a lot of garlic at once and store it for daily use, see this post for complete instructions.
- Recommended for this Recipe Our Private Reserve Greek extra virgin olive oil (from organically grown and processed koroneiki olives). And from our all-natural spice collection ground sumac and za’atar spice blend.
Nutrition
Bundle and Save!
Four of our best-selling signature olive oils, perfect for everyday use.

This is great! Tedious to peel the chickpeas, but it turned out delicious and my whole family loved it.
Hi Suzy, I was wondering if I could freeze some for later?
Hi, Natalie. I don’t freeze hummus, but you can refrigerate it for 3-4 days.
Thank u!
Can you make this if you can’t afford an expensive food processor?
Hi, Deborah. You can try a regular blender or immersion blender. Mixing by hand with a potato masher may also work. The results may not be as smooth as with a food processor, but it will still be tasty!!
Wow!!! Seriously the tastiest hummus I’ve ever eaten. I got curious and tried it before I added the za’atar and cayenne, I loved it as is. I’m never buying hummus from the store again. Now I must learn to make my own tahini!
Thanks, Sonali! Be sure to check out our Tahini Recipe. Super easy, super yummy!
THANK YOU FOR INTRODUCING ME TO ROASTED GARLIC!!!!!
This recipe, I’ve made it twice in less than a month!!! I LOVE IT!!!! <3
That’s awesome! So glad you’re loving it!! 🙂
Too easy and tastes incredible! With this and your roasted red pepper one, you have freed us from supermarket hummus forever…Thank you!
Wonderful!
Yum!!! It’s delicious!!!
Yay! Glad you liked it!
Hi Suzy
If I make this, how long will it keep in the fridge? Thank you for shearing the recipe.
Hi Pat! So so sorry I just saw your question…I’m not always able to get to comments immediately. Because of the citrus and roasted garlic in this, ideally you would make it the day you serve it…a few hours earlier if you like. One evening before is fine as well, and keep in tight lid container in fridge (don’t garnish until ready to serve).
Thank you Suzy!
My pleasure!
Hi
I am always cofused when people just call for tahini. Do they mean tahini paste or the tahini sace??
I love your recipies and have made quite a few. Delicioys! Thank you for sharing these? Pam Addoms
Hi Pam, great question. When a recipe calls for tahini like we have here, it is calling for tahini paste (directly from the jar). I will typically add the word “Sauce” when I mean for you to add tahini sauce that’s been prepared with citrus etc. as a sauce to accompany a dish. That would be this tahini sauce recipe: https://www.themediterraneandish.com/tahini-sauce-recipe-how-to-make-tahini/
Thank you so much for getting back to me. I really enjoy your recipies!
My pleasure!
I made my dried chickpeas in my Instant Pot while the garlic cooked. Then I followed the recipe to the letter. It is amazing! I make a lot of hummus from scratch. I love this one with the roasted garlic and feta. Thank you!
Maureen, that’s brilliant! Thanks so much for sharing! I have yet to buy an Instant Pot. Seems like a good use for it!
Never knew how easy it is to make it! I am definitely going to make my own hummus! But removing the chick pea skin sounds pretty tricky… What is the easiest way to remove the skin??
Hey, Mie! You can see the step for removing the skins in this traditional homemade hummus tutorial: https://www.themediterraneandish.com/how-to-make-hummus/
Enjoy!
I can’t believe I never make my own hummus! I love the idea of extra garlic bc I can’t get enough. Who needs cheese dip for the super bowl? I want hummus!
Lol! Garlic for the win!
Gotta love hummus!
Absolutely!
Ok, you definitely need to be my neighbor. If you have hummus, I will always bring the wine! This looks incredible!
Sounds like a party to me!
I could snack on this all day long! I love the garlic flavors!
I’m so with ya!
This looks heavenly, I can smell all that roasted garlic now!
Smells so good!